Wednesday, June 19, 2013

SharePoint 2013: Unexpected response from server. The status code of response is ’500′. The status text of response is ‘System.ServiceModel.ServiceActivationException’

copyright from: http://sharepointthing.wordpress.com

After having this issue on newly installed SharePoint 2013 farm in production environment, I figure it out that Single server is running out of memory. Especially, thanks to one new process noderunner.exe.
Noderunner.exe is the new executable of search service on SharePoint 2013. This process can’t turn it off because Search is one of essential service application in SharePoint 2013, and it is integrated in many features. So, there are some things you can do to reduce the impact of Search on your system.
Solution 1
Reduce the Search Service Performance Level with this PowerShell command:
Set-SPEnterpriseSearchService -PerformanceLevel Reduced
or
Set-SPEnterpriseSearchService -PerformanceLevel PartiallyReduced, which is in between reduced and Maximal
Solution 2
Limit the Memory Footprint of NodeRunner.exe is one thing that is not so recommended. There is a configuration setting for NodeRunner.exe’s configuration file that can limit RAM usage of a single process to specific value in megabytes.  This configuration file is located at: C:\Program Files\Microsoft Office Servers\15.0\Search\Runtime\1.0\noderunner.exe.config.  The configuration setting is under the nodeRunnerSettings node and it’s called memoryLimitMegabytes.  Its default value is 0 (unlimited).  Every time you change it, you’ll need to restart all of the noderunner.exe processes.
On some blogs I have found that noderunner.exe has memory leak and this is known bug in SharePoint 2013

Thursday, June 13, 2013

Document ID Feature

Copyright from:  http://www.codeproject.com

Introduction

In this article we can explore the Document ID feature and how to programmatically retrieve documents based on the IDs.

Scenario

Your customers are using Document Libraries for creating, updating and sharing documents. A problem could arise when the same document could exist in multiple libraries with the same name. There should be a way to identify the document using some Unique ID so that the document could be managed effectively independent of the location.
Document copy 1
 
Document copy 2

Solution

SharePoint already contains the Document ID service feature which could be used to address this problem. Document ID Service is a Content Management feature and explicit activation is needed in the site collection level. Once activated all the documents in the site collection will be assigned a unique ID.
Note: The Document ID is different from Record ID.  Additionally List items cannot be assigned Document ID.

How to enable Document ID Service?

You have to go to the Site Collection Top Level Site and choose Site Actions > Site Settings > Site collection features.
In the appearing page Activate the Document ID Service feature.
On activating the feature a Timer Job will be assigned to generate Document ID for all the existing documents.
You can make the Timer Job run immediately by going into Central Administration > Monitoring > Check Job Status > Scheduled Jobs link.
Click on the Job named Document ID assignment job and in the appearing page click on the Run Now button. This should create Document ID for all the documents in site collection libraries.

Document ID Settings

Once the feature is activated you can change the settings through Document ID Settings link as shown below. This link is only visible once you enable Document ID Service feature.
In the appearing page you can change the Settings like Prefix for generating ids for example: COM-DOC-1, COM-DOC-2 etc. You can assign a prefix of 4 to 12 characters.
Click the OK button to continue. You need to run the Timer Job again to see the immediate assignment of IDs.

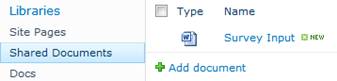
Viewing the Document ID

Once the Document ID is assigned you can go back to any library in the Site Collection and use the View Properties menu item to view the ID associated.
In the appearing dialog the Document ID is shown.
 
Note: Copying documents will create new Document ID for the new document. Moving document will retain the original Document ID.

Using Document ID Programmatically

Now we can use Server Object Model to get a document using the Document ID. Please follow the following steps to achieve the same:
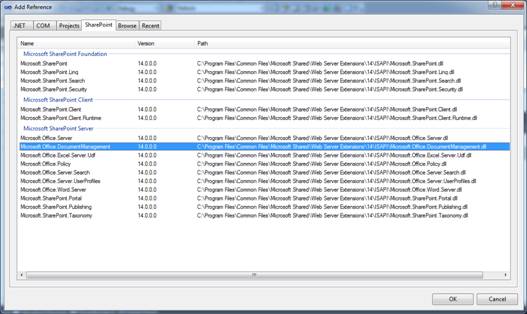
Step 1: Create a new SharePoint 2010 > Console Application
Step 2: Add reference to Microsoft.Office.DocumentManagement assembly
This assembly should be residing in the 14hive\ISAPI folder. You can use the Add Reference dialog box > SharePoint tab for locating the same.
 
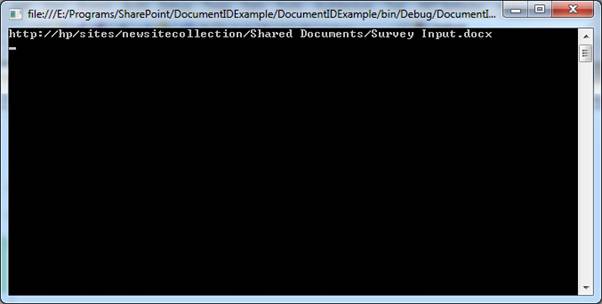
Step 3: Create the code to fetch by Document ID.
You have to use a DocumentIdProvider instance to perform the same. The following code fetches the Document URL based on the Document ID.
static void Main(string[] args)
{
    SPSite site = new SPSite("http://localhost/sites/newsitecollection");
    DocumentIdProvider provider = DocumentId.GetProvider(site); ;
    var result = provider.GetDocumentUrlsById(site, "DOCUMENT-4-1");
    Console.WriteLine(result[0]);
    Console.ReadKey(false);
}
You need to change the Site URL and Document ID string according to yours. On running the code the URL of the Document is shown.
With the document URL in hand you can write your own code to manipulate it.
Note: You can also use the DocumentId.FindUrlById() method to retrieve the URL as a string.

References

Summary

In this article we have explored the Document ID feature and retrieving documents based on the Unique ID.
Following are the points to summarize with:
  • Document ID Service is a Content Management Feature
  • A Site Collection Level Feature
  • Once activated all documents are assigned unique IDs
  • Programmatically we can retrieve document by ID
  • Prefix can be used along with the Document ID
  • A Timer Job is responsible for assigning the IDs

Details about how Document ID Service is activated

copyright from: Chun Liu on SharePoint

You may have found that Document ID Service is a very interesting feature. Sometimes you activate it and it just works as expected. But sometimes you activate it and it doesn’t work immediately. A typical example is to activate it on a team site and a publishing portal site. On the team site, it works immediately, but on the publishing portal site, it doesn’t work immediately. So what is the reason behind?
The reason why this feature works like that is related to how it is activated. Basically, when we activate this feature, it will check if the current site collection is a big site or not. If the site collection is not big, it will just enable the DocId on the site collection and register a work item for the Document ID Assignment timer job (DocIdAssignment). But if the site collection is too big, it will just register a DocIdEnableWorkItem for the Document ID Enable/Disable timer job (DocIdEnable). So to big site, it relies on the DocIdEnable timer job to enable the DocId. But you may find even if you run this timer job immediately after the feature is activated, the DocId is not enabled. It is because when the DocIdEnableWorkItem is added to the site by the feature activation, it has been specified to be executed 30 minutes later to avoid the potential conflict. You can check the real scheduled delivery time by querying ScheduledWorkItems table in the content db. So the DocId will only be enabled when you run DocIdEnable timer job after the scheduled delivery time. For example, suppose you activated DocId feature on a publishing portal at 8:00am, the DocIdEnableWorkItem was scheduled to be delivered at 8:30am. If you ran DocIdEnable timer job before 8:30am, nothing really happened. Only when you ran it after 8:30am say 8:35am, DocId was enabled then.
The final question is how big a site collection is big? The boundaries are maximum 1 web/site, 40 lists/web and 20 doclibs/web. A publishing portal is too big because by default it has 3 webs. The OOTB document center is OK because by default it has 1 web, ~30 lists and ~15 document libraries. The numbers are hard coded and, so far as I know, there is no way to change them

Tuesday, June 11, 2013

SharePoint 2010 Development Environment on Windows 8 RP

copyright from: http://blog.mikehacker.net
Disclaimer:  The information found in this blog post is not endorsed, recommended, or supported by Microsoft.  If you run into any issues with this configuration you are on your own!  You have been warned.
This blog post outlines how you can get SharePoint 2010 running on Windows 8 RP for development purposes.  I put this together as a way to test out Visual Studio 2012 RC with SharePoint 2010 on Windows 8 RP.
To get started, please review the MSDN document called Setting Up the Development Environment for SharePoint 2010 on Windows Vista, Windows 7, and Windows Server 2008.  These are the basic steps required for getting SharePoint 2010 running on Windows 7.  To get SharePoint running on Windows 8 RP there are a few additional steps which I have outlined below.  Some of the steps will reference information in the MSDN article linked above.
  1. Download and Copy the SharePoint installation file to a folder (such as c:\SharePointFiles) on the computer where you are installing SharePoint and doing your development.  The SharePoint installation file should be a single .EXE file such as OfficeServer.exe.
  2. Extract the installation files by opening a command prompt window and then typing the following command at the directory location of the folder where you copied the installation files in the previous step.    OfficeServer.exe /extract:c:\SharePointFiles
  3. Using a text editor such as Notepad, open the installation configuration file, config.xml, located in the path c:\SharePointFiles\files\Setup\config.xml and add the following line inside the tag:
  4. Save the configuration file.
  5. Review the configuration file.  It should look similar to the XML block shown in Step 2 sub-step 5 in this document.
  6. Install the following prerequisites:
    1. Microsoft Sync Framework
    2. Chart Controls
    3. Filter Pack – Located in the c:\SharePointFiles\PrerequisiteInstallerFiles\FilterPack folder
    4. SQL Server Analysis Services ADOMD.NET
  7. Enable Windows features by running the command shown in Step 2 sub-step 8 in this document.
  8. Manually enable the Windows Identity Foundation feature by:
    1. Go to the start menu (press the Windows key on the keyboard)
    2. Type: “Windows Features”
    3. Click on the Settings shown below the search box
    4. Click on the Turn Windows Features On or Off option on the start menu
    5. Check the Windows Identity Foundation 3.5 option and then click OK.
    6. Wait for the feature to be enabled.
  9. Open Internet Information Services Manager and expand the server node in the left tree menu to expose the Application Pools grouping.
  10. Select Application Pools in the left menu and then click on the Set Application Pool Defaults… action in the right menu.
  11. Set the .NET Framework version to V2.0 and then click OK
  12. Select the DefaultAppPool from the list of application pools and then click on the Basic Settings… action in the right menu.
  13. Set the .NET Framework version to .NET Framework v2.0.50727 and then click OK.
  14. Run the SharePoint 2010 installer by typing the following at the command prompt:  c:\SharePointFiles\Setup.exe
  15. Accept the Microsoft Software License Terms
  16. On the Choose the installation you want page, click Standalone to install everything on the developer workstation.
  17. After the SharePoint files are installed you will be presented with the option to run the SharePoint Products and Technologies Configuration Wizard.  You should allow this to run.  If you do not run the Wizard now you can run it at a later time.  The SharePoint installation is not completed until the Wizard is run.
  18. One the configuration Wizard completes you will see your new SharePoint 2010 Site.
Note:
  • SharePoint 2010 Only works with application pools that are set to version 2 of the .NET framework.  If any of the application pools used by SharePoint are set to anything else you will receive an error during the SharePoint 2010 Products and Configuration Wizard.   You can return to IIS manager and review the application pool settings at any time.  If the wizard fails due to the wrong .NET version you can modify the application pool and then restart the wizard.
I would like to hear feedback If you try running SharePoint 2010 on Windows 8 RP for development evaluation purposes.

Thursday, June 6, 2013

SharePoint 2013 Minimal download SharePoint:AjaxDelta

Copyright from: sharepointfordeveloper.blogspot.com

SharePoint 2013 Minimal Download Strategy (MSD) new feature introduced by Microsoft that improving end user experience. I recently check the master page and find some interesting tags that used most at the top of the placeholders.i'e SharePoint:AjaxDelta Tag.


SharePoint:AjaxDelta wrapping all our favorite Delegate Controls and other elements in the Master Page. What this AjaxDelta control does is to only download to the client (browser) what has been changed since the previous download. If nothing has changed, nothing is downloaded Ajax Style.

Following are the AjaxDelta control that are available in the Master page.
  1. DeltaPlaceHolderAdditionalPageHead
  2. DeltaSPWebPartManager
  3. DeltaSuiteLinks
  4. DeltaSuiteBarRight
  5. DeltaSPNavigation
  6. DeltaWebPartAdderUpdatePanelContainer
  7. DeltaWebPartAdderUpdatePanelContainer
  8. DeltaTopNavigation
  9. DeltaSearch
  10. DeltaPlaceHolderPageTitleInTitleArea
  11. DeltaPlaceHolderPageDescription
  12. DeltaPlaceHolderLeftNavBar
  13. DeltaPlaceHolderMain
  14. DeltaFormDigest
  15. DeltaPlaceHolderUtilityContent
when you click on any of the page you will see the start.aspx page  and following by # then your site page URL. example http://xxx/_layouts/15/start.aspx#/SitePages/Home.aspx. The start.aspx page is responsible render the Delta changes control.


The Minimal Download Strategy is by default enabled on Team sites, Community sites but MDS is not enabled on publishing sites. MDS is a web feature.